

Matching Bows to Arrows
©Dean Torges/The Bowyer's Edge™
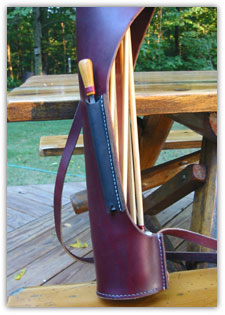 |
| Jack Bowers' new Wilderness Side Stalker, exclusive to the Bowyer's Edge™, featuring a 6" file pouch. |
Techniques differ, but the principle for sharpening anything—plane irons, chisels, knives, scrapers or broadheads—is the same, regardless of the tool or its edge. There's no secret and it's very simple. First you put the burr on, then you take the burr off.
A burr tells you two things: that you've removed enough metal to come to a fresh edge, and that the edge lies hidden under the burr. Put the burr on, take the burr off. Thassit.
However you arrive at this destination is up to you. Jigs, fixed file rigs, whetstones, buffing wheels, Lansky hones, or freehand with a file—each technique gets you there, but all have their peculiar pitfalls and inconveniences. Whetstones remove metal slowy. Consequently, many whetstone users work and work and never raise a burr in the first place. Those who use a file often end up pushing the burr back and forth from one side of the edge to the other. In the process, they lose their filing angle, never get the burr cleaned off, and become frustrated with the amount of metal they have removed for a lack of results. Many times steel users only hide the sharp edge under an aligned burr, which is a flimsy thin piece of steel that the butcher's steel makes behave temporarily. All buffing wheel polishers must go back to their motorized equipment before resharpening their arrow. Since they can't retouch their broadheads for required maintenance while afield, they never stump shoot with the same broadhead arrows they hunt with.
Of all these techniques, only the file offers expedience and convenience at home or in the field. Admittedly, filing takes more skill than using jigs and such, but you don't use a bow because it's easier than other forms of hunting, do you? Learn to use a file and you can put the edge on your broadheads that belongs there any time, any place.
Put the burr on. Take the burr off. You can tell when you've raised a burr by feeling for it with your thumb or forefinger. You can also tell when it disappears this same way. You can test for sharpness (i.e., whether or not you've removed the burr) by laying the edge on your thumbnail and, resting its weight there, dragging it across the nail. If the edge bites the length of the blade, it's sharp. If it skips, either the burr is still upon it, or the burr never got raised in the first place.
Put the burr on, take the burr off. Fred Bear kept rotating a broadhead 180 degrees and filing each bevel in turn. Always he moved his file the same, from heel to point. The stroke into the bevel of the near edge would remove the burr, and the next stroke, on the bevel to the far side of the blade would reestablish a burr as the file moved away from the edge. Rotating the blade 180 degrees, the next stroke into the edge would remove the burr just raised, and the stroke on the far edge would re-establish it. He continued in this process, with lighter and lighter pressure, turning the broadhead, filing into one bevel and away from the other, round and round, until the broadhead was sufficiently sharp—in other words, until no burrs remained on either side of the edges.
The technique I use is the same at home and in the field. It's similar to Fred Bear's and shares the premise of the burr with any other good technique. It yeilds the results I desire. If you follow it, you will get good results, too.
Here is how to establish your filing angle, an angle of 22 1/2°. It provides the best compromise between sharp and durable. Lay your file across the blade, perpendicular to it, as though you were gong to file off the edge. With the file laying across edge, lower the file tang half way toward the ferrule. That places the file at a 45° angle to the plane of the blade. Lower the file half way again toward the ferrule and you will have the correct filing angle of 22 1/2°. No worries about being too self-conscious and methodical at first and working too slow. With practice, you'll visualize the 22 1/2° angle, your muscles will memorize it, and it will soon come second nature to you.
Remember, however, that a precise or exact angle is not the goal. Raising and removing a burr to reveal a sharp, durable edge is the goal, and something near 22 1/2° will simply help you achieve it.
When starting with a new broadhead, file the factory bevels enough at 22 1/2° from both sides (into the near side and away from the far side) so that no light glints off either edge when viewed from directly above.
|
||
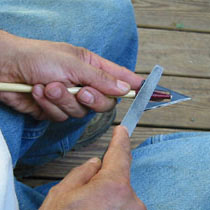
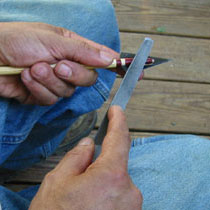
File from heel to point on far side of broadhead until you raise a burr. Finger on left hand used to stabilize broadhead. |
Then with a sharp 6" mill bastard, work the edge away from you several times in succession. Feel on the underside of that bevel for a slight burr with your forefinger by whisking it along the edge, from the ferrule out. If you do not feel a burr, return to the edge away from you and stroke it until you raise a slight burr that you can feel from the underside along the whole length of the edge.
 |
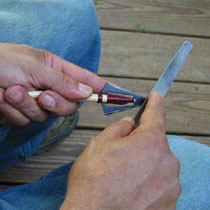
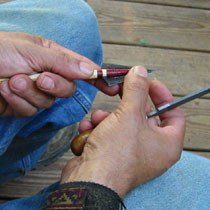
Feeling for the burr with index finger of left hand. |
Once you raise this burr, turn the head over so you can get to it, lighten the pressure considerably and push the file into the burr as you stroke from heel to point.
|
||
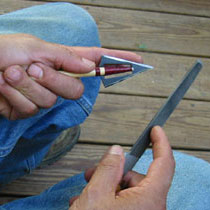
Once a burr is established, turn broadhead over and file into the burr to remove it, moving from heel to point. |

Whisk your thumb along the newly filed bevel. If you addressed the file to it at the correct angle, the burr disappeared.
 |
Feeling for the burr with the thumb. |
The question now is, Did it come off altogether, or did you simply push it back to the other side? Whisk the other side with your finger to find out. Likely you will find that the burr moved, though it's likely smaller and skips here and there. If so, push it back lightly with another file stroke or two, and then take it off from the underside again, lightly. Continue alternating back and forth with light file strokes until you can no longer feel a burr along either bevel. Try the thumbnail test to confirm that the edge is indeed sharp.
After you have moved to the other edge and followed the same process, file the point off at an angle of 30° to minimize the likelihood of it rolling up with bone contact. Determine the angle using the same method you did to arrive at 22 1/2°. Visualize the file two-thirds of the way from 90 degrees. Keep the tip sharp, just make it more like an axe edge and less like a knife edge.
You may wish to refine the sharpness further with a hone, a steel or a strop. Really, though, a filed edge done as described requires no further attention, and its array of tiny sharp serrations will make hair pop off your arm.
A three-bladed broadhead is sharpened with this same technique. Lay the file flat across two bevels. By stroking away from your body, you are removing the burr on the edge closer to you while establishing a burr on the edge away from you. Feel for the burrs. After they're removed, the edges are keen. Angle off the tip or point.
Just because you put a sharp edge on a broadhead does not mean it will stay there indefinitely. Keep checking your broadheads. When they fail the fingernail test, reestablish the edge. You'll require only a few wipes with the file to recreate a slight burr on an oxidized edge, and a few more wipes to remove it. Maintenance is easy with a file and can be accomplished quickly and conveniently.
File sharpened broadheads offer other advantages. You'll be more inclined to stump shoot with a broadhead you can resharpen in the field, and you'll not be reluctant to use it on small game when the opportunity arises. Such a practice keeps your mind sharp, and builds confidence, too. Once you've shot a particular broadhead arrow in the field and resharpened it several times, there'll be no hesitation and no surprises come pounce time.
Remember: Put the burr on. Take the burr off.
