

Barred for Life — A Tale of Grinding Truth
©Dean Torges/The Bowyer's Edge™
Barred fletching belongs on wooden arrows in the same way that a taut string belongs on a bent stick. These form such a perfect union and yield such a timeless truth that Moses didn't even bother to write it down.
If I don't have at least one barred feather on a wooden arrow, then I've got a second-class arrow. I wouldn't ask it to do first-class work. But who wants to pay the going price for barred fletching, provided he can even find some for sale?
One of the attractions of our sport is that it teaches if you don't have what you need, you probably can and should make it. I think it was no less a champion of the American wild turkey than Benjamin Franklin who cautioned against early trends toward consumerism with this warning: "Don't buy nothin', don't throw nothin' away, make whatever you can."
So gather up discarded turkey and goose wings from hunting buddies. Because in the spirit of our sport, the spirit which believes personal growth attends the acceptance of total personal responsibility, what follows are directions for making a simple feather grinding clamp and instructions for grinding precise and exact fletching.
As you toil at making beautiful arrows, you'll be reminded of Maurice Thompson's spiritual guide Tommy and his observation: "Any stick do for bow, good arrow damn heap work." Don't be discouraged. There is a big difference, which our language tends to ignore, between making arrows and assembling them. Remember the quality of Tommy's arrows and that he once "gave the finest exhibition of archery... perhaps ever seen by anyone." Though it may appear that you are laboring after arrows that persuasive consumer arguments urge you to buy in component form, if not altogether readymade, we both know that you are building much more.
I use my clamp on a drill press with about a 60 grit 3" drum sander. It allows grinding the quill on two edges. First, it makes the quill on the "bottom" or glue edge a uniform thickness; then, by flipping it 90°, it grinds off the "overhang" along the inside curve of the feather.
If you don't have access to a drill press, you can use the clamp with a belt sander moored sideways on a plywood platform that extends to provide a work table. Shim to raise the sander enough to get the height of the clamp body under the belt.
You can also enhance the accuracy of your grind by fashioning a thin hardwood insert with a gentle arc slightly less than the length of the sander's platen and slightly wider than the width of the belt. Slide it between the platen and the belt. Normal belt tension will hold it in place when you turn the sander on, producing a convex surface to grind against.
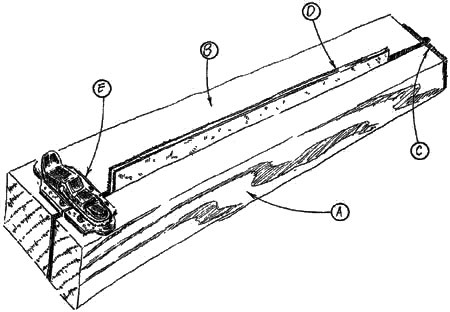
Clamp in the vertical Position
Part |
Description |
Dimension |
Qty |
A |
Inside Hardwood Jaw |
1w x 1.5h x 18 |
1 |
B |
Outside Hardwood Jaw |
2w x 1.5h x 18 |
1 |
C |
Steel Butt Hinge |
1.5 x 2 |
1 |
D |
28 Ga. Tin Clamp |
2 x 14 |
2 |
E |
Chest Type Draw Catch |
1.5w x 2.75 |
1 |
Constructing the clamp is a straight forward matter. After you've milled out the two hardwood jaws, attach the butt hinge with the two jaws clamped together. Do this before you screw on the tin. This will load the hinge and provide the squeeze you need to keep the sanding drum from grabbing and scooting the feather.
Screw on the tin several inches in from each end and 1/2" proud of the top. Countersink the screw heads to allow the tin faces to sandwich flat against each other.
Last, attach the draw catch so that it exerts good pressure the length of the tin. (The yoke of the hasp can always stay looped around the catch, even when the jaws are opened.)
File off any tin, hinge or hasp part that overhangs the hardwood edges and might keep the jig from sliding smoothly along the table or against the guide fence.
 |
 |
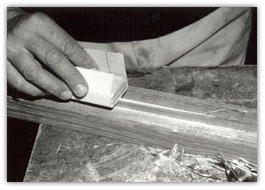
Step One — Cutting out the best portion of the feather. |
Step Two — Stripping off the leading edge of the feather. Pull from the feather's tip to its point. |
Feather preparation for the grind is equally straightforward. You will obtain a smoother, cleaner grind if you first dry the feathers past ambient humidity. Place them in a 90° to 100° F hotbox for a~day or two or treat them like deer jerky in the kitchen oven (wives do not need their husbands' permission to do this, but husbands should ask first).
If the quill is too wet to grind smoothly, the leading edge of the feather will strip off in one piece when you clean it off the quill. If it keeps breaking through the skin, the quill is dry enough.
 |
 |
Step Three — The feather clamped so that the inside edge curve with the center groove hangs over the inside jaw. |
Step Four — Thicknessing the glue edge by eyeballing the job off the groove down the center of the quill |
To jig the operation, place the clamp in the vertical position with the inside jaw under the sanding drum. Position the tin at a slight gap (1/32" to 1/16") from the drum. Place a straight edge fence of scrap stuff against the jaw and attach it to the table so that the inside jaw can ride against it and maintain the gap. You are now jigged for the second step in the grinding process.
To jig the first step, measure the distance across the inside jaw (it should be 1"), add to that the height of the tin above the body (1/2") and the height of the finished quill (1/16"). Rip a short length of stock to this total width (1-9/16" in our model).
I really don't use the spacer guide but instead eyeball the job off the center groove of the quill, tapering slightly. Use the spacer until you are comfortable with the operation.
 |
 |
Step Five — Grinding the overhang along the inside curve of the feather. The clamp rides against the fence. |
Step Six — A few swipes with 120 grit paper removes roughness and scalloping. |
To begin the grind, place the trailing edge of the feather, either right or left wing (it doesn't matter which), into the clamp so that its inside curve overhangs the tin on the inside jaw. Position the quill to rest atop the tin with one hand as you slowly close and lock the jaws with the other.
Place the clamp in the horizontal position resting on the outside jaw. Place the spacer between the jaw and the fence and make two or three passes to thickness the quill to its center groove. Then simply remove the spacer, flip the clamp 90° to the vertical position and size the overhang on the inside edge. The clamp will ride against the fence, the grinding wheel almost contacting the tin.
Before you remove the fletching from the clamp, wipe each ground surface about six to eight times with 120-grit paper backed by a hard flat sanding block. This will remove any scalloping the grind may have caused and smooth off the pith for a neat gluing surface.
A Few Tips
- When you get to furious grinding, a fine powdery dust fills the workplace. So it is good to use something other than your lungs to filter the air.
- I only use the choicest part of each feather. Since I fletch 5 1/2", I cut out a 6" section to grind and discard the rest. These clamp dimensions will allow you to grind full length feathers if you really wish to follow Ben's advice.
- Store feathers and fletching with a few loose mothballs in paper sacks. Otherwise an insidious grub will eat a trail across them. I suppose you could spray them with a mild disinfectant as an alternative.
- Steam resurrects crushed feathers
- Though each turkey wing yields only six to eight primaries, don't throw away those large soft and wide secondaries. They're perfectly suited for work on flu-flus.
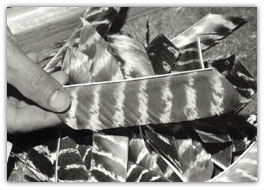 |
In the End — A nice pile of feathers ready to trim and glue. |
I write these directions and personal sentiments during Ohio's spring turkey season. My three-week mission is to pin a few extra barreds on a strutting tom. Then I can parlay those magical feathers into a dozen more arrows that in turn might beget who-knows-what! If I sound like Horatio Alger turned ugly, I've got my reasons.
Which reminds me of a quote that Benjamin Franklin really did write: "So convenient a thing it is to be a reasonable Creature, since it enables one to find or make a Reason for everything one has a mind to do."
Ben understood why barreds belong on wooden arrows.
Addendum
Shortly after this feather-grinding article appeared in print, I changed the trimming and thicknessing operations (illustrated originally as Steps 4 and 5) to make them fail-safe and mindless, and their results consistent and uniform—desirable features when you have a large batch of feathers to grind at one sitting. These improvements suck the skill from the operation, but they make economic sense—just like work at the office. You can grind a hundred feathers in less than an hour with this new technique, and they will be as perfect as any you pay commercial operations 20 dollars plus shipping and postage both ways to grind for you.
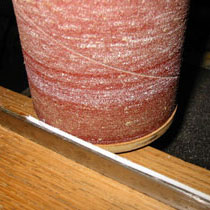
The basis for the improvement "rests" on a rub plate that affixes to the bottom of the drum sander. See Fig 1. I made mine out of 1/4" birch plywood, but you could have one turned in a machine shop of Delran or Nylotron or some other hard, friction-reducing material. The rub plate extends about 1/32" beyond the sanding sleeve.
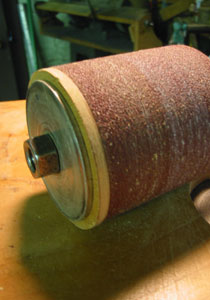 |
Fig. 1 |
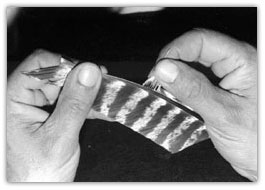
In addition, you will need a thicknessing shim that lies upon the outside hardwood jaw. See Fig 2. Make it less than two inches wide and in thickness just proud of the tin jaws by a hair or two. I've painted this one black and tilted it 90 degrees toward the camera so it shows up. Its height above the tin added to the overhang of the rub plate will determine the thickness of the quill. The feather in this photograph is partially thicknessed.
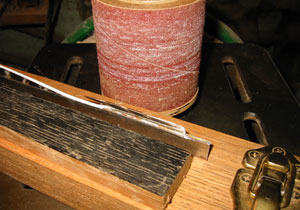 |
Fig. 2 |
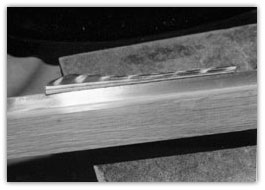
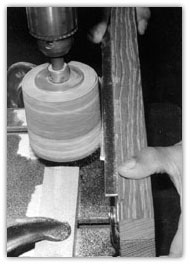
In Step Four, the rub plate now rides against the shim. It trims to thickness in one quick pass. No need to strip off the leading edge of the feather first. Fig 3 reveals the slight overhang of the rub plate past the sanding sleeve, and Fig 4 gives an eye level view of the operation.
Fig. 3 |
Fig. 4 |
In Step Five, the rub plate rides against the tin jaws to trim off the overhang and make the quill of uniform width. See Fig 5 and 6.
 |
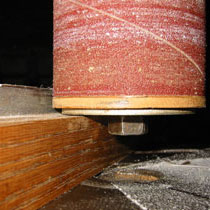 |
Fig. 5 |
Fig. 6 |
I'd also recommend a finer sanding sleeve than the 60 grit originally suggested. 100 grit cuts plenty fast enough and leaves a smoother surface.
It will take you about four hundred feathers to save a Ben Franklin.
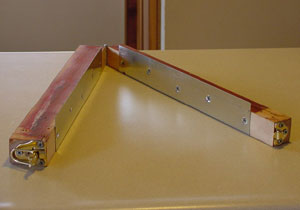 |
Feather jig made by Thomas Morrell, who found jaw alignment more accurate with the clasp mounted to the end. |
Thomas Morrell dedicated electric motors rather than a drill press to the grinding operation, and made extra clamps for his friends to load, keeping the process moving. You can view his setups here.
