

Building Rattan Kids bows
©Dean Torges/The Bowyer's Edge™
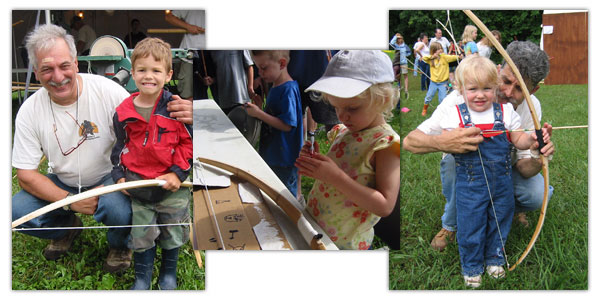
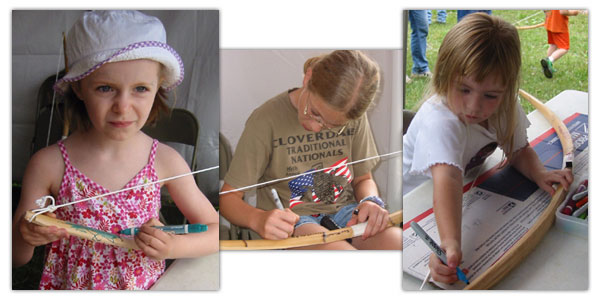
I've published several articles on making kids bows. Their creation has long interested me because of the implications to our sport. To get them into as many small hands as possible, I wanted bows that were economical, easily built, and durable. Beyond those simple criteria, I wanted the construction to be easy enough that kids could witness and participate in it, thereby valuing the results beyond something merely handed to them free. I wanted to arm the neighborhood, so to speak, and in the process inspire adults no less than children.
The little hickory-backed hickory bows I devised for those first articles were inexpensive and easily made, but they came up something short for durability. I worried that they might injure a youngster if they broke. In the mid 90's I discovered rattan and bent it in this direction. Before long, I'd developed a process for making virtually indestructible bows that had excellent cast and were cheap and easy to build.
Wanting to expand the boundaries of bow giveaways beyond friends, relatives, and acquaintances, I found an ally in the Association for Traditional Hunting Archers. They purchased materials and eventually even provided machinery for the purpose of making and distributing free bows and arrows each June at the Cloverdale Nationals in Cloverdale, Indiana.
After the second year, the Deer Creek Archers of the Cloverdale Conservation Club joined ATHA to underwrite this annual bow and arrow giveaway. In four years the event put over 300 bows and countless arrows into the hands of children below the age of 12. This year the Tour for Kids joined in with arrow-making duties. It's my hope that this is just the beginning, that others will see the importance of such a program and commit their time and money to it. So far, the rattan bow-building activity has spread to MoJam and to Alabama.
I featured the building process at the end of my DVD, Hunting the Bamboo-Backed Bow, and it is there to see, start to finish, for anyone who balks at reading directions to arrive at understanding.
The materials list includes 1/8" nylon Venetian blind cord for use as a bowstring (simply looped and knotted at both ends), hockey stick tape for wrapping the handle area, and magic markers for decorating the bows. Except for the rattan, that's it. You can also include leather for wrapping an arrow rest on with the handle tape, and a bow square for marking nock position with a felt-tipped pen.
The rattan itself should be selected for this purpose. Much of rattan is marked with splotchy areas on the rind where the rind has separated. These indicate a weakness similar to chrysalling, and will cause a hinging in the bow limb that requires much tillering time and effort to overcome. If you purchase your rattan from Bamboo and Rattan Works, Inc. and tell them you want it selected for kids' bows, they will know exactly what to send you and will sort through these splotches while still keeping you fairly straight pieces. Each piece costs about 25 dollars, is 1-5/8" in diameter, and measures 102" in length. It yields four bows 50" long, nock to nock.
The process itself can be either assembly line and high-production, or hand-powered and laid back. When approached as an efficient group effort, it requires machinery, specifically a bandsaw or two and a belt sander. However, Buz Ackerman routinely sets up his shaving horse alongside the bandsaws at Cloverdale and MoJam and with a drawknife turns out bow after bow. He has also carried his experience back to Alabama with him and, sponsored by ATHA, has single-handedly made and distributed rattan bows at Boy Scout rendezvous.
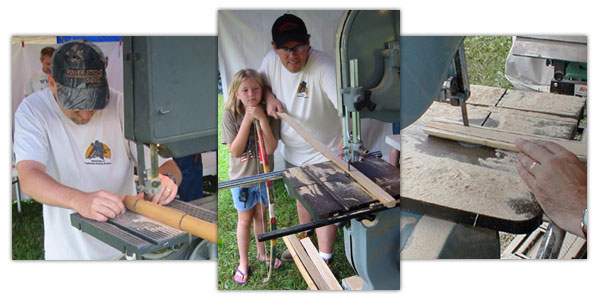
The 102" rattan culm comes shipped evenly divided into 51" lengths. The first step in construction is to rip each culm in half on the bandsaw. The complication here is that rattan does not always grow perfectly straight. It sometimes undulates along one axis and is straight along another. Imagine a snake moving across a flat surface. Sorta like that, only less pronounced. As a rule, turn the snake 90° and rip him so that his belly falls off in one half and his back in another half. This provides you with a flat back for your bow pattern, and undulations to one side or another get cut off after the pattern is marked out.
The exception to this approach occurs when you find spidery clusters marking rind separation. If this cluster would fall completely onto either the back or the belly of the snake, so to speak, then turn the culm 90° so you are ripping him bilaterally through the vertebrae. This orientation distributes the weakness over both halves and places the cluster on the side of the stave, increasing the likelihood that it will disappear altogether when the taper is band-sawed into the limbs. Rip such a culm as straight as you can rather than follow the sideways undulations.
Once you have determined an axis for ripping, mark it by drawing an orientation line vertically on one end of the rattan. As you feed the rattan through the band saw to rip it in half, hold it so that your eye can quickly reference this orientation mark. A quick glance there now and then allows you to keep the culm in a consistently vertical position so that your rip job does not end up corkscrewed.
If you eyeball the bandsaw blade down the crown of the rattan culm while you cut, you will thereby do an accurate job of halving the culm. However, it is more important that you keep the cut consistently vertical than that you cut the culm exactly in half. Pay attention as you approach the handle area to steer through the middle, providing equally thick portions of rattan to either side, especially on culms that you have had to turn 90°. The limbs and tips taper, so if you run off center one way or another approaching the nocks, the remedy is in the tiller.
After the culm is ripped in half, trace the bow shape onto the newly exposed interior. Make a tracing pattern for this out of thin plywood, masonite, or heavy posterboard. Center and mark the handle area 6" long and about 1 3/8" wide. Leave the limbs near the handle full width for a few inches, and then taper their outline in a convex line to a 1/2" width at the nocks. (Note: Be careful not to remove too much material from the handle area or you will hinge the bow. Don't do much more than round this area over on the belt sander's idle drum, relying on the tape to make a comfortable grip.)
It's important to note that the interior of the rattan becomes the back of the bow, not the belly. The yellow semi-circle forming the rind becomes the belly. The bows will work from either direction, regardless, but this way makes a livelier bow. The greater advantage is that you can tiller the bow from its back upon a belt sander while it is braced, witnessing instant results each time you sand and tug a little on the bowstring.
Tillering goes quickly and smoothly if you employ the faceted approach that I've written extensively about both on my website, in my tillering pamphlet, and in Hunting the Osage Bow. Most of the work is done on the bandsaw, including the formation of pin nocks. The stationary belt sander merely finesses the tiller and cleans up the work.
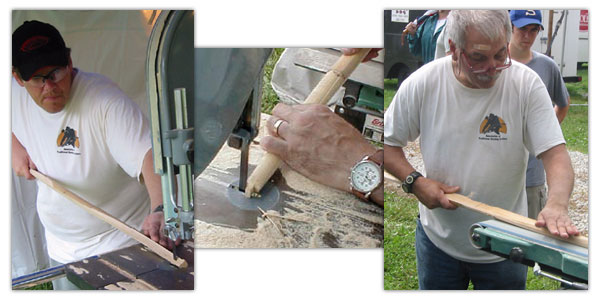
To facet, cut the bow to outline, staying outside your lines and holding the traced surface always perpendicular to the bandsaw blade. This squares up the sides with the back. The belly, of course, remains a semicircle and never gets ground on or cut in any way, now or during the tillering process. The nodes are shaggy and remain untouched, adding character and color to the bow.
After the bow is cut to outline and the side facet is perpendicular to the back, facet the limbs. Do this by imagining a line running down the side facet of each limb about 1/4" in width parallel with the cut line of the rind. Cant the stave so that the side facet leans into the saw blade at about a 45° angle. Cut along this imaginary line, starting from the nock and removing waste toward the handle, keeping the cut parallel with the edgeof the rind and running the blade out of the stock 4" or 5" before it reaches the handle area. Flip the stave over and do the same from the other side. Results resemble the staged sequence of tillering illustrated in the third box on page 96 of Hunting the Osage Bow, with angled facets along the length of the limb.
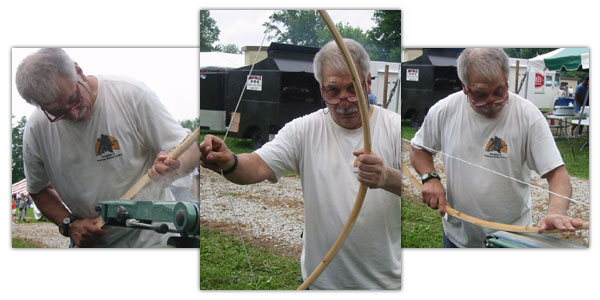
Cut in pin nocks, taking care to do it to the depth of the bandsaw blade's width (which is 1/2"-see Sources of Supply at the end). Cut the shoulders off square so that the two kerfs meet at their bottoms. If you make each pin nock exactly 1/2" long, bowstrings can be tied up of reasonably uniform length on a jig comprised of two nails in a stick.
The stave is now ready for truing up on the belt sander. Use the idle drum to define and round over the handle area. True up the limb sides by rocking the bow on the platten. Since the limbs are convex, this takes little time on an aggressive 40 grit planer belt (see Sources of Supply).
Grind the peak off the back formed by the two new facets, giving the work your best eyeball estimate to induce a uniform taper to the limb thickness from all directions. Brace the bow and pull on it a few times while holding it in front of you for a critical looksee. Go to the belt sander with the braced bow and accomplish final tiller by grinding on the stiff sections, giving the bow a few jerks on the string to see what registers, and then grinding some more until the bow bends evenly at the braced position. Be careful not to sand the string off the nocks.
- You can wrap a handle any number of ways, but hockey stick tape is inexpensive, forms a positive grip and goes on quickly. Tuck in a piece of leather for an arrow rest before you begin wrapping.
- The bowstring will stretch a little at first, but it will settle in quickly. Use a bow square and a felt tipped pen to mark a nocking point.
- No need to varnish or shellac anything, but you can provide some magic markers for decorations.
It doesn't take long to make such a bow. At Cloverdale, with someone tying strings, someone wrapping handles, someone ripping stock, someone tracing patterns and someone cutting to outline, etc. and so forth, a crew of about 12 men, women and children turns out 80 complete bows on a Saturday morning before lunch.
Though these directions are offered with a mind toward rapid production, you can spend some time on the details of each bow and make it quite sophisticated. A heat gun directed to limbs until they soften permits the creation of fanciful recurved tips or exotic limb profiles. Refined shaping and sanding, leather handles, arrow plates and a durable finish add further polish. I've seen a Cloverdale giveaway bow come back the next year skillfully varnished and still going strong, adorned with snakeskins and horn tip overlays. I've also seen them painted and lavishly decorated.
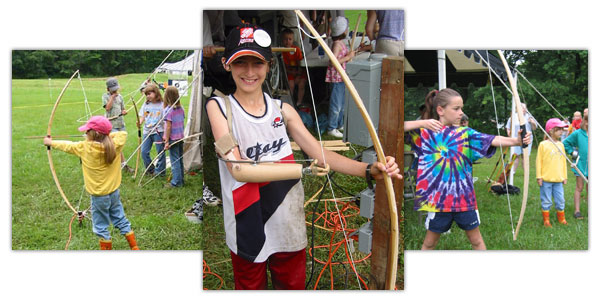
Their performance will surprise you, too. Chris Smith's eldest son Zach used his to win third place in the clout shoot at MoJam two years ago while competing against adults with adult bows. I've wondered myself what such a short, supple bow might become in a recurve shape with sinew backing, though it would probably have to be sinewed with the rind forming the bow's back.
Those of us who do this are fond of saying how much enjoyment we receive from small faces lit up with excitement. Not so much for me. It's really rather easy to make children smile. Though I enjoy passing out bows and arrows to them because of what it means to our sport, the real thrill for me is seeing adult faces light up and knowing the satisfaction parents, spectators and participants feel at the end of the day.
I don't worry about kids too much. It's the adults who concern me — harried and besieged from too many directions. Watching a few step aside, spend their own time and money, and give effort to promote a legacy among children they don't even know gives us reason to be optimistic. That should make us all smile.
Source of Supply:
Rattan. Bamboo and Rattan Works, Inc., 470 Oberlin Ave. South, Lakewood, NJ 08701. Ph (800) 422-6266. Specify clean rattan for kids' bows.
Bandsaw blades. Suffolk Machinery Company, http://suffolkmachinery.com/. Rattan and bamboo shorten blade life, but Timber Wolf blades far outlast others while cutting smoothly and aggressively. I recommend the 1/2" blade with 4 tpi.
Sanding belts. Klingspor Abrasives, http://klingspor.com/. Specify the 40 grit planer belts.
Visual Illustration. http://bowyersedge.com/. DVD, Hunting the Bamboo-Backed Bow. 70 mins.
