

Patching a Bow Limb
©Dean Torges/The Bowyer's Edge™
Sometimes bad things happen to the belly side of a bow, especially to bamboo-backed bows that use quarter sawn slats. Typically, a pin knot travels across the width of a limb and cannot take the compression. The area around it begins to cave. Or sometimes a swirl in the grain will break loose. Sometimes a belly begins giving way around a punky area where the annual rings grew around dead wood or encapsulated a knot. Or the feathered area begins lifting at the glue line where the riser handle fades into nothingness. And, of course, sometimes faulty tillering causes an area thinned beyond its measure to surpass its elastic limits and hinge or chryssal.
One of the great differences between bows of natural materials and fiberglassed bows is that natural bows almost always give you advance warnings of their distress, whereas fiberglassed bows almost never do. Natural bows usually plea to you for help, while fiberglassed ones jump at you from the bushes. Can you ignore these pleas knowing that belly problems can be fixed on backed or self bows, in either case and in every instance, with an effective, long-lasting patch? Or is it that you worry such patches will signify your failure as a bowyer? They won't. Broken or retired bows do that. Patches will proclaim your generosity of spirit. You will come to view one on your favorite bow as something resembling a mole on the cheek of perfection—an exquisite and valuable distraction on an otherwise flawless beauty.
I first learned of patches in a conversation with Steve Martin when I was a budding bowyer. I knew of Dutchman's plugs from the literature, but Steve described with wonder an old bow he'd seen patched in terms that sounded tantalizing and simple: "It looked like the guy had taken an ice cream dipper and scooped out a place on the belly, then glued in a perfect patch."
Years later, when the need arose on several bows, I nearly went nuts trying to unlock the mysteries of the ice cream scoop metaphor. I rigged up a router jig with a positive and sophisticated method for scalloping wood, employed a plunge router and began carving into several failing bows, even going so far as to turn corresponding patches of a precise, calipered fit on a wood lathe. I tried glues of every sort for the bond: G-2, aliphatic resin, Gorilla Glue, Urac, Resorcinol, etc. and so forth. You name it, I tried it and failed with it. Mostly I stayed with G-2 because every indication of the spec sheet suggested it was the premiere glue for strength in stressed, waterproof wood-to-wood bonds. One memorable bow contained a palimpsest approaching a dozen patches, one applied over the crumbling edge of another until they laid out along the limb in succession, some burying others, their count impossible to determine from the belly surface.
I'd wait for each successive patch to cure until I could smooth it down and shoot the bow enough to pass verdict. Like some crazed alchemist certain he could change dross into gold, I was certain that if I worked hard enough and fitted a patch perfectly enough, I would learn to resurrect bows. It was just a matter of quieting the voice that kept whispering "You know, bubba, you coulda built five-six new bows by now, trying to save pieces of wood that are sending you messages you refuse to hear."
The same principles I learned making dependable, durable glue joints on bamboo-backed bows, especially in the feathered dip of the riser handle, finally broke the patch code for me. I was working too hard at being too perfect. My background in designing and building furniture and my pride in craftsmanship were creating joints of the close tolerance that furniture glues required but that furniture glues weren't strong enough to hold, joints that catalyzed glues were strong enough to hold but that were too closely mated to allow catalyzed glues to work. Catalyzed glues have gap-filling properties that actually require gaps in the mating surfaces, gaps that I was not providing. The light came on while I was reading the Urac specs from the maunfacturer, Nelson Paint Company. [For an understanding of the various strengths and weaknesses of diverse glues in bow-building applications, see: Thinking Glue]
So it is with bows. Their creation and perfection is all about rediscoveries and homage to the past rather than innovation. I can now make a patch that looks like I'd "taken an ice cream dipper and scooped out a place on the belly, then glued in a perfect patch". You can, too. Here follows the process that works for me. You can try alternative tools and materials, such as a hacksaw blade for a toothing iron, or G-2 for Urac, but looking over my shoulder I'll state categorically that hacksaw blades rough up an area and round it over rather than trough it into glue reservoirs like an iron does, and I promise that G-2 and most other epoxies beyond Urac and Resorcinol will eventually break your heart.
The following principles illustrated and described here for patching a small imperfection will carry over to larger areas that have hinged or chrysalled on a limb. Also, you will find it easier to make repairs to slats and staves rather than to bows. By this I mean that you can examine a slat or a stave, anticipate problems with imperfections, and make preemptive patches, turning probable failures into first rate bow wood, incorporating the patch into the building process from the outset.
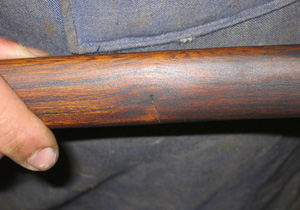
A crack across the belly appeared from a weakness within the wood on this finished bow, the result of one blemish in an otherwise excellent slat. (Photo 1) I'd placed the worst face of a punky knot against the bamboo-, judging that sufficient good wood remained on the compression side of the neutral axis to withstand the stress.
 |
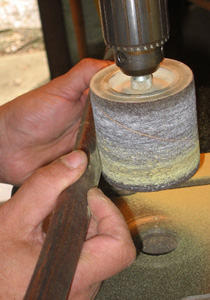 |
Photo 1 |
Photo 2 |
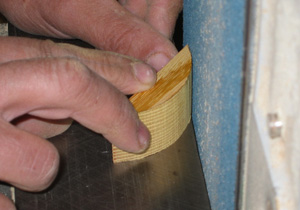
Using a coarse grit on the sanding sleeve of a three inch drum chucked into a drill press, grind out the fault as though it were tooth decay. (Photo 2) You can use the nose drum of a belt sander as well. Make sure, if you do, that you grind to one side or other of its crown.
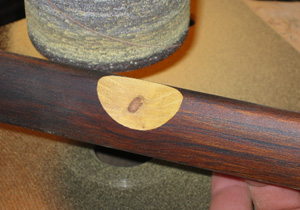
You will notice that the deeper the scallop, the larger the knot revealed itself. In this case, I chased it to the other side of the neutral axis, and then soaked it thoroughly with a quality cyanoacrylate to shore it up. (Photo 3) Usually, you will be able to sculpt out the fault altogether, and you need to grind no further than that.
 |
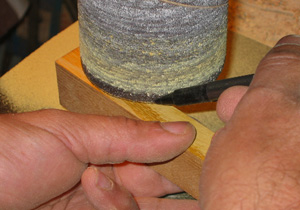 |
Photo 3 |
Photo 4 |
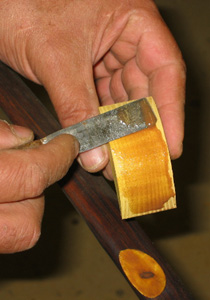
The patchwood is chosen carefully. It should be quarter sawn, flawless, of course, and squared up to the best of your ability. Use the drum sander for a pattern, tracing its arc onto the patchwood. (Photo 4)
Be aware of the direction of its grain because the best way to work the patch flush with the surrounding belly is with a sharp paring chisel. Attempt it with rasps or by grinding and you will surely dish the patch or eat into the surrounding belly wood and jeopardize the tiller. Orient the patch so that you can pare its top and its exposed side from the same direction without snagging and lifting grain. You won't like being required to wipe a chisel in one direction on top of the belly and then another direction to pare off the side because even if you make this concession to grain direction the transition area between top and side wants to dig and tear out wood below the surface of the patch. Mark the grain direction so there will be no doubt that you've faced it correctly when you glue down the patch.
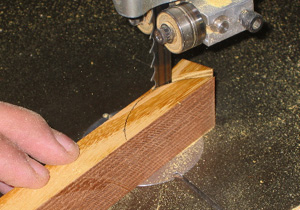 |
Photo 5 |
Saw as closely as you can to the outside of the line. (Photo 5) If you have a bench sander, turn the table at right angles to the belt and work the patchwood to the inscribed radius. (Photo 6) If not, true it with the flat side of your Nicholson #50 rasp. Check often for fit by holding the patchwood between your eye and a light source and moving it back and forth along the scallop. (Photo 7) Mate these two with a dry fit to the best of your ability.
 |
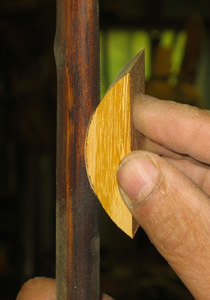 |
Photo 6 |
Photo 7 |
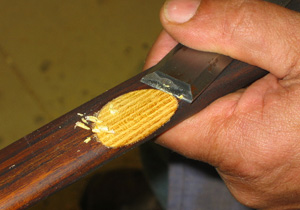
Use the toothing iron to score both the scallop and the patchwood. Rather than simply abrade the surfaces, nestle the teeth into preceding furrows and retrace these furrows with successive efforts, scoring them as deeply as you can. These are your guarantees for a tight joint that you cannot starve, so do them well. (Photos 8 and 9)
 |
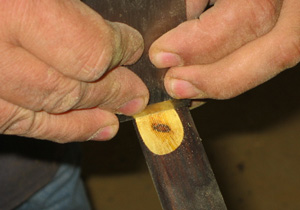 |
Photo 8 |
Photo 9 |
I prefer Urac, and I wouldn't stray for choices beyond it or Resorcinol. Use Resorcinol for strength if your glue joint is not mated too well. It has better gap-filling properties. The glue line is objectionable to me, however, and if you follow the process described here there's no reason for a sloppy joint. Mix the Urac by weight at the ratio of 14 parts catalyst to 100 parts resin. This may not be absolutely critical, and you may mix by volume instead, but the patch absorbs enough punishment that in this step and elsewhere I want each element, each step of the process weighing in my favor. Spread an amount sufficient only to wet both mating surfaces, paying attention to trowel the glue into the toothing iron furrows. Too much glue here and you have a mess. (Photo 10)
 |
 |
Photo 10 |
Photo 11 |
With the bow limb clamped up securely so that the scallop faces directly up, work the patchwood into the scallop to force out any air pockets. Seat it as well as you can with moderate finger pressure. (Photo 11) Do not under any circumstances apply clamping pressure, as with a spring clamp or a C clamp. The weight of the patch and the suck of the glue as you settle it into the scallop provides the correct gap between patchwood and scallop, assuring a tight and lasting bond.
Remove as much waste as you can with the bandsaw or with a hand saw so that the patch is sized sufficiently to carve down by hand. (Photo 12) If you are uncomfortable sizing the patch after is in place, do it before glue-down.
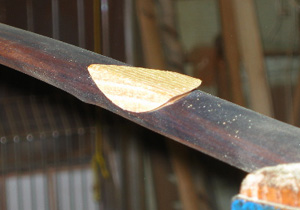 |
Photo 12 |
With a sharp paring chisel, slowly work the patch flush with the surrounding wood. Glue squeeze around the patch will guide your effort so that you do not pare too deeply. It's desirable to leave a slight crown in the middle of the patch, something the chisel will do automatically as you pare from the edges to the middle, and then from the middle to the opposite edges. Remember, wood surrounding the patch was compressed during the tillering and the patch wood is new, so a little hump as compensation will keep you from hinging this area. If your chisel is sharp enough, there's no need to sand the patch. (Photo 13)
 |
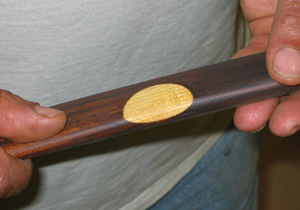 |
Photo 13 |
Photo 14 |
You can finish the patch however you wish, dyeing it to resemble the neighborhood, or you can leave it natural, as an exquisite distraction on the cheek of perfection. (Photo 14)
